.jpg)
If you follow me on Instagram you may already know that I’ve recently started welding and am having a great time with it. I still have a lot to learn and I practice when I can, but it’s going well and I’ve got a lot of things I want to weld! I’ve made a couple welding-related posts on my blog which you can see here:
and also here:
As with any kind of project in the shop, there are always new tools to be had. Cutting metal down to size is a major part of any welding project and starting out I was just using an old miter saw (that I’d previously been using for woodworking projects). I swapped out the wood cutting blade and installed a 10-inch abrasive cut off wheel. It worked but it was crazy loud and while the cuts were somewhat accurate-ish, it didn’t leave a very clean edge. Additionally, the sparks it was throwing everywhere were not only a safety hazard to me physically, but also a safety hazard in a shop with a bunch of wood and sawdust all over the place. The last thing I want is for my shop to go up in flames so I needed to find a better solution.
I looked at the abrasive wheel chop saws (Ridgid, DeWalt, Milwaukee) made specifically for metal but they’re still loud and they still throw sparks, even with their built in shield. I also looked at the Evolution saws with metal cutting blades but I had read mixed reviews about them….and from what I’d seen, they seemed like they’d be screechingly loud. What I really wanted was a metal cutting bandsaw but I wasn’t sure I had the space in my small shop, so I started looking at portaband style saws and as I researched a bit more I came to find the HE&M 782XL bandsaw by Femi. I came across this saw while browsing the Trick Tools website. I looked at other saws but kept coming back to the 782XL model and one of the additional features of this saw was the ability to flip it up and mount the vertical table accessory on it so you can do some freehand cutting when you need a curve or you need to do something like a cope joint. I won’t be discussing that feature in this particular blog entry/video just yet, but I’ve tried it out and it’s a great feature. I’ll highlight it a bit more on a future project. For now I’m just going to briefly go over some basics regarding my first impressions on the standard cutting features of the 782XL since the project I’m working on at the moment only required basic cuts and some mitering/angles.
Of course, you can see all the features, details and specs about the 782XL at TrickTools.com, but I’ll touch on a few things here. For my small shop, and the kind of metal work I’m doing this saw is just the right size. It has a small footprint and is easy to pick up and move around. One thing to note however, when you tilt the saw up (either when finishing a cut or when you’re going to use the vertical table feature) the saw will tip backward unless you clamp the front edge down. The base of the saw is solid but not very heavy which is why it tips, but I’ve been clamping it down and we’re all good. I’m planning to mount the saw on a set of drawer slides under the welding table pretty soon. This way I can slide it out when I need it and push it back in when I don’t. Plus, I’ll bolt it to the drawer platform so it doesn’t tip.
The material holding clamp on this saw is awesome. It keeps my workpieces right where I want them and there’s been no shifting or any movement whatsoever during the cuts. I’ve made cuts on angle steel, square tubing, solid rod….no movement. On my current project I needed to make some angled cuts and to test the accuracy of the miter scale I loosened the knob and turned the saw to the 45-degree mark on the scale and made a cut. I set my digital bevel gauge to 45 and compared the cut to find it to be a little bit off. Fortunately it’s pretty easy to adjust using the adjustment screw and offset washer. You simply loosen the screw and rotate the washer to compensate. The only problem with that is now the other numbers are going to be off by the amount you adjusted the washer, including the zero point. The zero point also has an adjustable washer so now I’ve got mine locked in to where I know when I swing it to 45 it should be 45 and when I come back to 0 it should be 0.
.jpg)
The cuts I made on this project were 15 degrees and 37.5 degrees so I made a test cut and compared to my digital bevel gauge before proceeding to the real cuts. Everything came out perfect not only when cutting 1 piece but I also doubled up and cut 2 at the same time so the cuts would be in the exact same spot and they were. I have no complaints about the quality of cut. It’s very crisp and needs minimal deburring with a file just to knock the sharp edge off and of course there were no tiny balls of fire flying all over the shop during the cuts, so that’s always nice 🙂 After loosening and tightening the knob for locking the miter position 4 or 5 times, it broke as I was tightening it down to do one of my test cuts. As I write this however, Trick Tools is sending me a replacement knob. In the meantime, a pair of pliers does the trick.
.jpeg)
Cutting can be done at 2 speeds, and you also have 2 start/stop options for running the saw. The first option is by keeping the power button in the “on” position and then squeezing the trigger on the handle as you bring the blade down to the workpiece. When you release the trigger the blade comes to a stop. The other option is to use this thin metal band that comes with the saw. What you do is attach it to the trigger and it’s supposed to keep the trigger squeezed for you and then you run the saw by pushing the main on/off buttons. I’ve been using this option but I ditched the little metal band and I use a Cable Cuff instead. Way better. I use Cable Cuffs all around my shop for keeping tool cords wrapped neatly. I highly recommend getting a few for your shop!
.jpg)
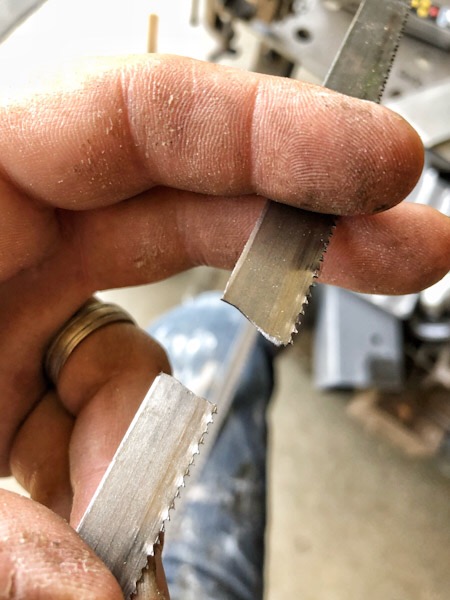
I got the saw package that came with 3 blades. One came installed while the other two came in their respective bags. I noticed after about 15-20 cuts that the pre-installed blade had a few broken/missing teeth already, and just a few cuts later the blade broke/snapped in the middle of a cut. I’ll be the first to admit that I’m definitely more familiar with cutting wood on my Ridgid bandsaw than I am with cutting metal on the 782XL, but I know you can’t go about it the same exact way. That being said, I don’t feel like I was forcing the blade beyond what might’ve been it’s capabilities or the saw’s capabilities. I think the blade just flat out broke!
.jpeg)

But just like with the miter lock knob, Trick Tools is sending me a replacement blade, so it’s all good! Taking out the broken blade and putting in the new blade should typically be an easy swap. I was in the middle of an angled cut however, and didn’t want to remove my workpiece from it’s position, so removing the blade cover and swapping the blades was a little trickier than it would normally be BUT if I weren’t mid-cut, changing the blade would’ve been a breeze. Tensioning the blade was also very easy.
The following video is just a short basic segment I put together (shot and edited on my phone) showing the saw in use for making a few cuts:
I’m still getting familiar with the HE&M 782XL but it’s already been a great tool to have in my shop. Even with the couple of very minor snags I’ve run into, I’m really happy with this unit. I wish I had the budget and the space for a larger model but for now this is what I can do and and it’s working out great. I really like not throwing sparks everywhere when cutting metal, and I’m really happy with the clean cuts that come off this saw.
I hope you’ll find the short video to be useful. I plan on documenting more projects and segments about the saw, and I hope you’ll jump out and subscribe to my channel! And of course if you’re not already following me on Instagram, I’d love to have you.
Also be sure to stay tuned to see future mods to my welding table, and if you’re looking to add a welding/fab table to your shop, I highly recommend a Certiflat table from weldtables.com. Pre-made sizes are on the site but you can also request custom sizes if you need something specific for your shop, which is what I did with my 30″x48″ kit. The Certiflat tables are very reasonably priced compared to other tables on the market. Use the following link to get your own welding table:
http://weldtables.com/#_a_cust13d
If you’ve got any welding, metalworking or fabrication tips, I encourage you to leave them in the comments. I’m always learning and I value your input/feedback. Thank you!
.


