What’s The Best Epoxy For Tables? Total Boat vs Famowood Glazecoat

Do you ave an epoxy tabletop project coming up?  Maybe you’ve been thinking about pouring epoxy for the first time, or maybe you’ve poured epoxy on a lot of tables in the past but are looking for another option to try out.  There are so many epoxy products on the market and the options can be overwhelming.  In this article I’m going over a couple brands that I’ve used and I’m going to discuss some of the pros and cons of each brand I’ve used.  So if you want to find out which tabletop epoxy is best, keep reading! If you’re more of a video watcher, check out my video instead:

I just finished another batch of tabletops and the main difference between this batch and the past batches was the brand of tabletop epoxy I used.  Over the last couple years I’ve done about 120 tabletops but for the first 110-ish I used a product called Famowood Glazecoat.  When I started that project I had never used an epoxy product before and I was a little intimidated, but the 1:1 mix ratio was pretty difficult to mess up.  For this most recent batch of tabletops I needed an epoxy product with some UV protection qualities which is what lead me to search for a different brand and my video talks a bit more about that.

I had always thought Total Boat epoxy was significantly more expensive than the Famowood Glazecoat but when I found the TotalBoat tabletop epoxy, it was only a few dollars more and I felt it was worth it to give it a try on this build.  In my video I also go into more detail about the pricing and how much the epoxy costs.  Definitely check it out!

Mixing & Consistency

When mixing up a batch of each brand of epoxy, there are a couple main differences that I noticed right away.  The first difference was the thickness of Part A.  The Famowood Glazecoat Part A was thinner and it flowed out of the bottle a little smoother while the Part A of the TotalBoat was noticeably thicker and poured out of the jug more slowly.  This will come into play later.  The next big difference is the duration of stirring and mixing of the two brands.  The bottom line here is, lots of extra stirring with the Famowood product….less stir time with the TotalBoat.  Again, more details in my video and why maybe a thinner mix might be preferred over a thicker mix depending on your project…

Setup & Cure Time

Curing time can play a huge role in finishing a project, especially if it’s a client project because time is money!  I found the Famowood Glazecoat took several hours before it was at the point where it was safe to touch without leaving a fingerprint in it.  That was usually an overnight wait time.  With the TotalBoat epoxy however, I found that I was ready to do another coat after about 4 hours (give or take).  This meant I could get get 2 or even 3 coats poured in one day.  Not too shabby!  A quick cure time is also helpful for other reasons.  For instance, a quicker cure time gives stuff like dust and bugs less time to land in the finish.  Of course, you should always do epoxy pours in the cleanest area you possibly can but when you work at home you gotta work with what you’ve got, haha!!!

Epoxy Odor & Smell

Any chemical process is going to have some kind of smell.  Famowood Glazecoat has a noticeably stronger odor than the TotalbBoat Tabletop Epoxy.  Check out the video to hear how the smell affects my father in law, haha!  Whenever you’re pouring these products (even the less-smelly products) make sure you open some windows and maybe even use a paint fume respirator!!

Epoxy Hardness

Remember earlier when I was talking about Part A of each brand and how it will come into play later?  Well, what I was referring to was the hardness of the epoxy once it cured.  I found that the thicker Part A of TotalBoat Tabletop Epoxy results in a harder cure.  I go into it a bit more in my video but basically I can certainly tell a difference in the hardness of the finished table top between the Famowood and the TotalBoat and I give an example of how I could tell.  I’ve also used both of these epoxy products for a couple turning projects on the lathe and again, the TotalBoat product was harder and more stable in my turning project (which was a wine bottle stopper).

Which Epoxy Is Best?

Well, after doing 110 restaurant tabletops with Famowood Glazecoat and then doing another 10 with the TotalBoat Tabletop Epoxy, I really fell in love with the TotalBoat. I feel like I can save time and money (and my sense of smell and my braincells) with the TotalBoat. For my projects and the way I use it, I have to say I’ve got a NEW FAVORITE PRODUCT!  And NO, for those of you thinking it, this is NOT a sponsored post.  I used these products and compared them on my own dime (well I guess it was the client’s dime, but you know what I mean, lol!).  Don’t get me wrong, the Famowood is still a good product.  The first 110 tables are still in great shape and holding up to the abuse very well.  But I think if you did that many tabletops with the Famowood and then did a few with the TotalBoat you’d notice a big difference too.  I just wish I had found the TotalBoat Tabletop Epoxy sooner!

You might want to just buy some of each and do your own first-hand comparison.  The following links are links to some products I’ve used when working on epoxy projects (via my Amazon links). As an Amazon Associate I earn from qualifying purchases, and any earnings made through my Amazon links helps me cover my webhosting costs.  I appreciate you all using my Amazon links!

Thank you so much for stopping by my site and reading up on my experiences with tabletop epoxies.  I hope you found it helpful and I hope you’ll watch my video (“What Is The BEST Tabletop EPOXY Resin – Famowood Glazecoat vs TotalBoat”) as well.  If you’re interested, here’s a link to a playlist where I built some of the previous tabletops.  Definitely a good watch!  TABLETOP BUILD PLAYLIST

Bonus

When doing as many tables as we’ve done, it’s really helpful to have a father-in-law who likes to get in some shop time, haha! My father-in-law has made the 5 hour drive from central California several times to give us a hand with various orders and to thank him for all the help I made him custom trophy designed and built just like the tables, complete with an epoxy coating! Of course, I had to put his go-to saying on the plaque, “good enough for government work!”

If you’re not already subscribed to my YouTube channel I would love to have you!  Here’s the direct link STUFFSETHMAKES ON YOUTUBE….login, subscribe, and hit the thumbs up! The channel is growing quickly and I have a lot of videos in store!

I also post frequently on Instagram and you can follow me there using this link: StuffSethMakes on Instagram

Thank you all again, see you on the next project! 

#epoxy #epoxypouring #tabletopepoxy #epoxyresin #epoxyprojects #totalboat #totalboatepoxy #famowoodglazecoat #epoxycomparison #epoxytable #epoxypour #epoxyart

Custom Reclaimed Wood Table Tops Rustic Home Decor Part 2

Thanks for coming back for part 2 of the Reclaimed Wood Table Tops build.  If you missed it, you can see Part 1 here, and I’ll also link the videos in this blog post.

In Part 1, I showed how I cut down and sized all the reclaimed wood and how I designed the modern geometric pattern for these table tops.  It’s an interesting process and if you missed it, you should check it out!  Here’s that video PART 1:

Here in Part 2 I’m trimming off excess wood and also making and attaching my own rustic edge banding.  I do it for both the round table tops and lazy susans as well as the square table tops.  Making the edge banding can be a little tricky depending on how thin you want your edge banding to be.  Yes, you can send it through the planer which is a great option, and that can work well for the edge banding for the square tables, but for the round tables it needs to be thin enough to bend and wrap around the circumference of the piece.  If you set your planer all the way down to the thinnest setting you’ll most likely munch the front end as you send it through.  In addition to that, the wood is so thin that it chatters a lot against the planer bed as the blades cut away the material, which can result in an uneven thickness.  Of course, you can always use some FastCap SpeedTape to secure the rustic wood to a piece of MDF or melamine but in my case I’d need a 5-6 foot long piece of sacrificial material (which I don’t have on hand), and it’s just a time eater to do it that way.  It’s much, much faster to just rip thin strips on my Laguna Fusion Table Saw, just watch those fingers!  Check out the following video to see the PART 2 of the Reclaimed Wood Table Top project:

Of course, PART 3 will be along soon and you know I’ll link it here as well.  You might also catch an early viewing if you follow me on Instagram.

The following image takes you to my Amazon Storefront where I’ve put together a few lists of some of the tools and materials I use in this video and in my shop on various projects.  Any purchases made as a result of using my links give me a small (very small) commission on the sale.  I appreciate it very much and I use those commissions towards covering some of the costs associated with running my site and my YouTube channel (stuff like webhosting and Adobe Premiere CC subscriptions).  So if you make any purchases, THANK YOU!!

Reclaimed Wood Table Tops For Local Restaurant

A while back I had the opportunity to build 84 table tops for Barona Casino’s employee dining area.  As the build progressed, I posted some photos and video clips on my Instagram account and I got a huge response with a lot of great feedback.  One of the clips I posted showing the epoxy pour even hit 39,000 views over the course of two days, so that was pretty cool!  A lot of people asked questions about the process so I decided that if I ever got another order of these I’d do an “official” video of the build.  Well, a new order came in and I shot a ton of footage.

The following video is Part 1 of the build, highlighting the preparation of the wood and how I go about laying out the design:

With so much interest in my various projects, I decided to set up an Amazon Storefront where I’ve curated a lot of my favorite and most used tools and products. I receive a small commission from any purchases made through my storefront and any purchases are very much appreciated!  You can visit my storefront here:

STUFF SETH MAKES – AMAZON STOREFRONT

I also hope you’ll jump out to my Instagram page and follow me there:  Stuff Seth Makes – Instagram.

If you’re interested in a custom build for your home or business, please contact me to get the ball rolling.  I’d love to hear about your project and see what I can do!

Repairing Teak Veneer on Mid Century Modern Furniture

I need to start by saying I’ve never done this before, so if you have any pointers in case I ever do one of these again, feel free to leave them in the comments or shoot me an email.

Aymerick Modern in San Marcos, California has got to have the largest inventory of mid century modern furniture I’ve ever seen.  If you’re looking for great pieces for your home, whether it’s a desk, a chair, a table….whatever…definitely check with Aymerick.  He really knows his stuff!  Recently he showed me some drawers to a piece he had acquired, but the drawers with the piece had been repaired/modified with a horizontal strip of veneer that shouldn’t have been there.  He told me he had some extra teak veneer and wondered if I could somehow update the drawer faces with the new veneer.  Having never really worked with veneer before, I was hesitant because I didn’t want to further damage the antique.  But looking at the situation and thinking it through a bit, I decided to go for it.  Here’s a picture of the drawers and you can see the horizontal strips that were added.  Why on only two of the drawers and not all three?  Who knows.  Fortunately Aymerick was able to remove the handles.  I think it would’ve been more tricky if this had to be done with the handles in place.

mid-century-modern-furniture

Here you can see the drawers after I started sanding down the finish:

mid-century-modern-veneermid-century-teak-veneer

And of course a picture of the roll of the teak veneer:

mid-century-teak-veneer-sheet

As I sanded, I noticed some of the edges of the original veneer cracking and lifting up and then a larger chunk lifted up when it caught the sandpaper and at first I panicked but then remembered I was repairing it anyway, so who cares, haha!  I started lifting up more edges and before I knew it, I had basically scraped off all the original veneer so I ended up just going for it and taking off all the original veneer.  You can even see the old veneer tape:

mid-century-danish-modern-furniture-repair

When I got to the horizontal strips and removed those, I found a bit of a mess.  It seems somebody had maybe chipped away a shallow 1-inch wide recess with a chisel or something but as you can see it wasn’t done with the steadiest of hands….or they were cross-eyed….or drunk…or both.  Either way, I needed to think of something so the new veneer would lay flat across the surface.

mid-century-danish-modern-furniture-damage-repairmid-century-danish-modern-furniture-damage-repair

The solution I decided to go with was to set up my Bosch router at the router table with a 3/4″ straight bit and made a couple passes to clean up the original recess and make it even and flat, even though it meant removing a tiny bit more material:

repairing-mid-century-furniture-with-router

And as you can see I’m left with a nice, even, clean recess:

diy-mid-century-modern-furniture-repairmid-century-danish-modern-furniture-diy-repairmid-century-modern-drawers-repair

Next I grabbed a piece of soft maple I had in the scrap bin and ripped down a couple strips that were slightly larger than the recess.  I put down some Titebond glue and and clamped the strips into the recesses:
mid-century-modern-drawers-repairfixing-mid-century-modern-furniturehow-to-fix-mid-century-modern-furniturehow-to-fix-mid-century-modern-furnitureMy next step was to trim off the excess from the maple strips, on the ends, edges and face.  I had to make some shims so I could keep the drawer leveled as I ran it across the router table, and I used Fastcap speedtape double-sided tape to secure the shims to the drawer bottom so the shim setup would slide with the drawer.

To do the trimming, I used one of my Mega Flush Trim bits from Infinity Tools.  This was this router bit’s maiden voyage….fresh out of the package.  I expected the edges and ends to trim up nicely but wondered how it would perform on the face.  The answer?  Perfectly.

infinity-tools-mega-flush-trim-bitshims-for-furniture-repairinfinity-tools-mega-flush-trim-router-bitshow-to-repair-furniture

The new veneer had a perfect seam down the middle and of course that needed to go straight down the center of the drawer faces, so I marked the center of the drawers so I’d have a reference line.  Then I used the reference lines and the seam on the veneer to trace the drawer faces, then I cut out the pieces:

mid-century-modern-veneer-repairteak-mid-century-danish-modern-scandinavian-furniture-veneer-repair-replacementteak-veneer-repair-mid-century-furniture

To glue the veneer I applied Titebond Original to the surface and spread it around evenly:

diy-dresser-drawer-repair

To clamp the veneer to the drawer face I made some clamping cauls out of some scrap wood.  You’ll notice the cauls have a slight curve.  This is so that as I tighten the clamps on the ends, the pressure is still distributed evenly across the whole long surface.  Of course I used other clamps too because you know what they say, “You can never have too many clamps!”

clamping-cauls-drawers-mid-century-furniture-repairwoodworking-clamps-for-furniture-repair

The clamping setup was a success!  Next would be to trim the excess veneer off the edges and wouldn’t you know…I forgot to take pics of this step!  I tried a couple techniques.  I tried carefully trimming with a new razor blade, following the backside edge of the drawer face.  A few light scoring passes got through the veneer nicely.  I also tried trimming the excess veneer over at the router table with a smaller Freud flush trim bit.  Both trimming techniques pretty much gave me the same results, however I got one tiny chip along the way:

mid-century-modern-teak-veneer-damage

The chip was actually a little smaller than what you see in the above picture, but I wanted to try and fix it so I enlarged chip ever so slightly and tried to square off the end.  Then using a scrap of the veneer I cut out a little teeny tiny sliver that would act as a veneer inlay, and I applied a very small amount of glue to the cut away area, spreading it evenly, and put a clamp on it so it would stay pressed down tight:

mid-century-modern-teak-veneer-inlaymid-century-modern-teak-veneer

After the glue dried I trimmed the excess off the tiny piece of inlay veneer and lightly sanded over it, hoping for the best, and:

mid-century-modern-teak-veneer-replacement-repair

So all in all I think this was a pretty successful repair!  Again, this is the first time I’ve ever done a project like this and I was just using my best judgement as far as techniques go.  The end result is a nicely lined up veneer (the veneer was already bookmatched).  I love how the teak woodgrain flows continuously straight up and down the drawer faces, almost as if I applied one long piece of veneer first, and then cut the three drawers apart, but I did them individually.  Not bad for a veneer rookie, haha!

mid-century-danish-modern-scandinavian-teak-furniture-woodgrain-bookmatch

Aymerick will proceed to color match and finish these out, and I believe he already has a buyer for this particular piece of furniture.  When I stopped by his place to talk about another project, he had about 20 other pieces wrapped and packed that were shipping out to customers.  So again, if you’re looking for a piece of mid century modern furniture to set off your space, check out what Aymerick Modern has to offer.  Who knows, maybe you’ll get a piece that I helped with too, haha!

Thanks for stopping by my blog.  I’m always learning so if you have any recommendations or other pointers as far as veneer repairs are concerned, let me know!

HEM Saw 782XL Femi Metal Cutting Bandsaw

hem-782xl-metal-cutting-bandsaw-femi-trick-tools

If you follow me on Instagram you may already know that I’ve recently started welding and am having a great time with it.  I still have a lot to learn and I practice when I can, but it’s going well and I’ve got a lot of things I want to weld!  I’ve made a couple welding-related posts on my blog which you can see here:

Useful Tools When Getting Started In Welding


and also here:

Certiflat Weld Tables – Must Have Welding Tools

As with any kind of project in the shop, there are always new tools to be had.  Cutting metal down to size is a major part of any welding project and starting out I was just using an old miter saw (that I’d previously been using for woodworking projects).  I swapped out the wood cutting blade and installed a 10-inch abrasive cut off wheel.  It worked but it was crazy loud and while the cuts were somewhat accurate-ish, it didn’t leave a very clean edge.  Additionally, the sparks it was throwing everywhere were not only a safety hazard to me physically, but also a safety hazard in a shop with a bunch of wood and sawdust all over the place.  The last thing I want is for my shop to go up in flames so I needed to find a better solution.

I looked at the abrasive wheel chop saws (Ridgid, DeWalt, Milwaukee) made specifically for metal but they’re still loud and they still throw sparks, even with their built in shield.  I also looked at the Evolution saws with metal cutting blades but I had read mixed reviews about them….and from what I’d seen, they seemed like they’d be screechingly loud.  What I really wanted was a metal cutting bandsaw but I wasn’t sure I had the space in my small shop, so I started looking at portaband style saws and as I researched a bit more I came to find the HE&M 782XL bandsaw by Femi.  I came across this saw while browsing the Trick Tools website.  I looked at other saws but kept coming back to the 782XL model and one of the additional features of this saw was the ability to flip it up and mount the vertical table accessory on it so you can do some freehand cutting when you need a curve or you need to do something like a cope joint.  I won’t be discussing that feature in this particular blog entry/video just yet, but I’ve tried it out and it’s a great feature.  I’ll highlight it a bit more on a future project.  For now I’m just going to briefly go over some basics regarding my first impressions on the standard cutting features of the 782XL since the project I’m working on at the moment only required basic cuts and some mitering/angles.

Of course, you can see all the features, details and specs about the 782XL at TrickTools.com, but I’ll touch on a few things here.  For my small shop, and the kind of metal work I’m doing this saw is just the right size.  It has a small footprint and is easy to pick up and move around.  One thing to note however, when you tilt the saw up (either when finishing a cut or when you’re going to use the vertical table feature) the saw will tip backward unless you clamp the front edge down.  The base of the saw is solid but not very heavy which is why it tips, but I’ve been clamping it down and we’re all good.  I’m planning to mount the saw on a set of drawer slides under the welding table pretty soon.  This way I can slide it out when I need it and push it back in when I don’t.  Plus, I’ll bolt it to the drawer platform so it doesn’t tip.

The material holding clamp on this saw is awesome.  It keeps my workpieces right where I want them and there’s been no shifting or any movement whatsoever during the cuts.  I’ve made cuts on angle steel, square tubing, solid rod….no movement.  On my current project I needed to make some angled cuts and to test the accuracy of the miter scale I loosened the knob and turned the saw to the 45-degree mark on the scale and made a cut.  I set my digital bevel gauge to 45 and compared the cut to find it to be a little bit off.  Fortunately it’s pretty easy to adjust using the adjustment screw and offset washer.  You simply loosen the screw and rotate the washer to compensate.  The only problem with that is now the other numbers are going to be off by the amount you adjusted the washer, including the zero point.  The zero point also has an adjustable washer so now I’ve got mine locked in to where I know when I swing it to 45 it should be 45 and when I come back to 0 it should be 0.

metal-cutting-miter-saw


The cuts I made on this project were 15 degrees and 37.5 degrees so I made a test cut and compared to my digital bevel gauge before proceeding to the real cuts.  Everything came out perfect not only when cutting 1 piece but I also doubled up and cut 2 at the same time so the cuts would be in the exact same spot and they were.  I have no complaints about the quality of cut.  It’s very crisp and needs minimal deburring with a file just to knock the sharp edge off and of course there were no tiny balls of fire flying all over the shop during the cuts, so that’s always nice  🙂  After loosening and tightening the knob for locking the miter position 4 or 5 times, it broke as I was tightening it down to do one of my test cuts.  As I write this however, Trick Tools is sending me a replacement knob. In the meantime, a pair of pliers does the trick.


Cutting can be done at 2 speeds, and you also have 2 start/stop options for running the saw.  The first option is by keeping the power button in the “on” position and then squeezing the trigger on the handle as you bring the blade down to the workpiece. When you release the trigger the blade comes to a stop.  The other option is to use this thin metal band that comes with the saw.  What you do is attach it to the trigger and it’s supposed to keep the trigger squeezed for you and then you run the saw by pushing the main on/off buttons.  I’ve been using this option but I ditched the little metal band and I use a Cable Cuff instead.  Way better.  I use Cable Cuffs all around my shop for keeping tool cords wrapped neatly.  I highly recommend getting a few for your shop!

cable-cuff-useful-tools

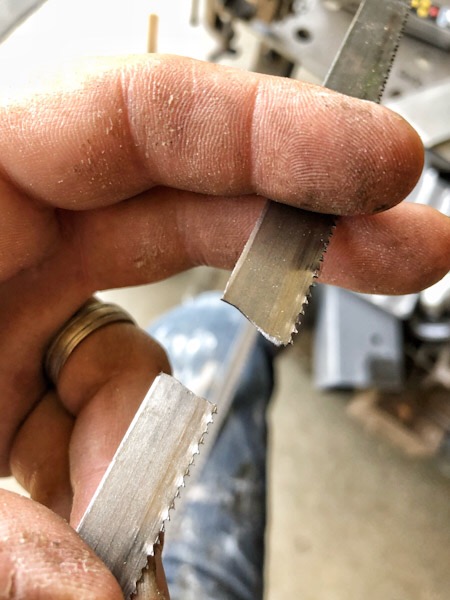
I got the saw package that came with 3 blades.  One came installed while the other two came in their respective bags.  I noticed after about 15-20 cuts that the pre-installed blade had a few broken/missing teeth already, and just a few cuts later the blade broke/snapped in the middle of a cut.  I’ll be the first to admit that I’m definitely more familiar with cutting wood on my Ridgid bandsaw than I am with cutting metal on the 782XL, but I know you can’t go about it the same exact way.  That being said, I don’t feel like I was forcing the blade beyond what might’ve been it’s capabilities or the saw’s capabilities.  I think the blade just flat out broke!

metal-cutting-bandsaw-bladebroken-bandsaw-blade

But just like with the miter lock knob, Trick Tools is sending me a replacement blade, so it’s all good!  Taking out the broken blade and putting in the new blade should typically be an easy swap.  I was in the middle of an angled cut however, and didn’t want to remove my workpiece from it’s position, so removing the blade cover and swapping the blades was a little trickier than it would normally be BUT if I weren’t mid-cut, changing the blade would’ve been a breeze.  Tensioning the blade was also very easy.

The following video is just a short basic segment I put together (shot and edited on my phone) showing the saw in use for making a few cuts:


I’m still getting familiar with the HE&M 782XL but it’s already been a great tool to have in my shop.  Even with the couple of very minor snags I’ve run into, I’m really happy with this unit.  I wish I had the budget and the space for a larger model but for now this is what I can do and and it’s working out great.  I really like not throwing sparks everywhere when cutting metal, and I’m really happy with the clean cuts that come off this saw.

I hope you’ll find the short video to be useful.  I plan on documenting more projects and segments about the saw, and I hope you’ll jump out and subscribe to my channel!  And of course if you’re not already following me on Instagram, I’d love to have you.

Also be sure to stay tuned to see future mods to my welding table, and if you’re looking to add a welding/fab table to your shop, I highly recommend a Certiflat table from weldtables.com.  Pre-made sizes are on the site but you can also request custom sizes if you need something specific for your shop, which is what I did with my 30″x48″ kit.  The Certiflat tables are very reasonably priced compared to other tables on the market.  Use the following link to get your own welding table:

http://weldtables.com/#_a_cust13d


If you’ve got any welding, metalworking or fabrication tips, I encourage you to leave them in the comments.  I’m always learning and I value your input/feedback.  Thank you!


.

Stuff Seth Makes specializes in woodworking and is known for creating unique handmade home decor items as well as custom rustic and modern style furniture. Based in Escondido, California but available for nationwide commissions.

LET’S GET SOCIAL